Hanging prepasted wallpaper borders is an efficient way to enhance any room’s decor. Drawing from my personal experience, this article provides a clear, step-by-step guide on how to hang a pre-pasted wallpaper border. Dive in to transform your space with ease.
Contents
How to Hang Prepasted Wallpaper Border
Hanging pre-pasted wallpaper border is not hard, but there are a couple of key steps to ensure your end product is accurate.
- You need to make sure your wall is ready. Sandpaper it to smoothen it and add some wallpaper primer-sealer where the border will go.
- Use a level, pencil, and measure tape to see where the top and bottom of the border will be for accuracy.
- Make sure you measure the walls and the corners included. Then, you can cut the border based on the measurements you took on the wall and leave an inch or two on each strip.
- Add warm water to a tray and place the border strip in this to soak. Make sure the adhesive is facing up. It will soak as long as the border manufacturer states.
- Pull the border out of the water and fold it with the pattern on the outer side. You need to activate the adhesive so fold the adhesive sides together. The paper will also get bigger, and you need to wait for the manufacturer specified times.
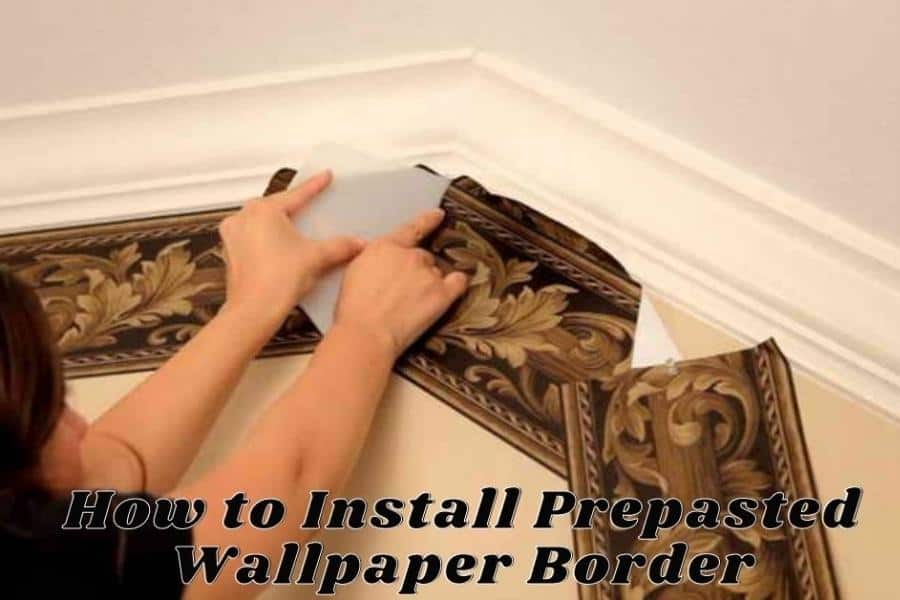
- Then you can unfold the papers and attach them to the mark you added earlier on the wall. Using a level might help with accuracy.
- For the next step, you need a brush to attach the wallpaper border to the wall. Attaching and smoothing out the border will be a low process; however, do it slowly; otherwise, it can get messy.
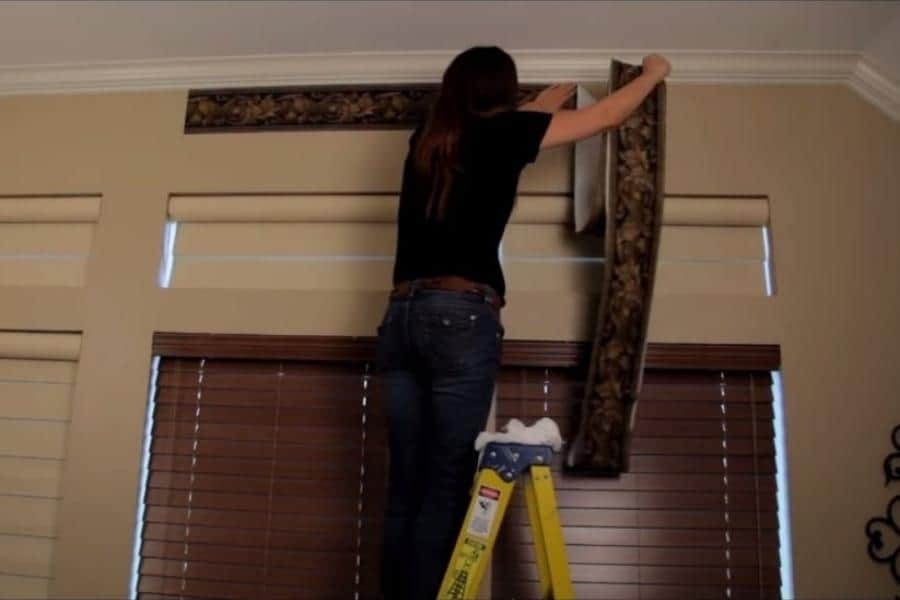
- When you get to the corner, you will wrap the additional inches over the corner. Continue smoothening out the border and if there is excess, add it on the next wall. If there is any excess protruding, cut it off with a small knife.
- After this, you move onto the next border strip and go through the same steps again. A good tip is to match the stripe pattern already applied, so you are attaching it accurately. You might have to trim it a little for precision.
- Your final step is to attach the border all over the walls that are left. Slowly, and steadily! With a damp sponge, you can remove any excess adhesive or moisture from the walls to ensure they dry quicker.
Materials and Tools Checklist
- Prepasted Wallpaper Border: Choose a design that complements your room’s aesthetic. Ensure that you purchase extra length to account for any potential mistakes or overlaps, especially if the pattern needs matching.
- Wall Primer-Sealer: A wall primer-sealer prepares your wall, ensuring the adhesive on the prepasted border bonds securely. This step is crucial for surfaces that have not been wallpapered before or for walls that are porous.
- Sandpaper (Fine Grit): To smoothen out any uneven surfaces on your wall. A smooth surface ensures better adhesion and a neater appearance.
- Measuring Tape: Accurate measurements are paramount when applying wallpaper borders. You’ll need this to determine the length of the border and to help position it correctly on the wall.
- Level: A must-have to ensure your wallpaper border goes on straight. A laser level can be particularly useful for extended lengths.
- Pencil: For marking guidelines on the wall. These marks will guide you when you’re positioning the soaked wallpaper strip, ensuring straight and level placement.
- Water Tray or Bathtub: For soaking the prepasted wallpaper border. The tray should be large enough to accommodate the length of the wallpaper strip.
- Smoothing Brush or Plastic Smoother: These tools will help you smooth out the wallpaper border once it’s on the wall, ensuring there are no bubbles or creases.
- Sharp Utility Knife or Scissors: For trimming excess wallpaper and making precise cuts, especially at the corners and where the walls meet the ceiling or baseboard.
- Sponge and Clean Water: A sponge helps clean off any excess adhesive that might seep out from behind the wallpaper border. Using clean water ensures you don’t introduce any contaminants that might affect the adhesive.
With the right materials and tools in hand, the process of hanging your prepasted wallpaper border will be much smoother. Each tool has its role in ensuring the finished product looks professional and lasts for years. Preparing in advance by gathering all these essentials will save time and reduce any mid-project hassles.
Preparation Tips
Selecting the appropriate wallpaper border for your room goes beyond mere aesthetics; it’s about creating a cohesive space that resonates with your personal style and the function of the room.
The right border can seamlessly blend with existing decor, acting as a frame that accentuates your room’s best features or, conversely, can stand out as a statement piece.
Either way, it’s crucial to choose a design that harmonizes with your furnishings, paint colors, and other decorative elements.
Environmental factors like humidity and temperature play pivotal roles in the wallpapering process. High humidity can weaken the adhesive’s grip, leading to peeling or bubbling, while extreme temperatures might cause the paper to contract or expand.
Before starting, regulate the room’s climate. Aim for a moderately cool and dry environment to ensure optimal adhesion and to prevent potential damage to the wallpaper.
If you’re wallpapering a bathroom or kitchen, where humidity levels tend to be higher, consider using a specialty adhesive or sealer to bolster the prepasted backing.
Conclusion
With this, you have now successfully hung prepasted borders all over your walls!